
This looks like a lot, but it’s not. Just making the process super-duper clear. 😉
There are six steps to complete this pre-work. Depending on your computer and internet connection, these steps may take some time. We’ve provided time estimates for each step. You will be downloading three items: the Unity Hub, the Unity software, and a Unity project package. You must download and install them in this order. All are free.
Unity System Requirements – This page outlines the basic system requirements you need to run Unity 2019.4.
Step 1: Download and Install the Unity Hub (available on Mac and PC) (~2 minutes)
The Unity Hub is a standalone application that streamlines the way you find, download, and manage your Unity Projects and software installations. Read more about the Unity Hub here.
- In a new tab, either Google “Download Unity Hub” or go to https://unity3d.com/get-unity/download, and then click Download Unity Hub.
- From your Downloads folder, double-click on the Unity Hub Setup file to begin the installation. (If on a Mac, drag the application into your Applications folder, then double-click on it.)
- Agree to Unity Terms of Service and follow the instructions to install Unity Hub.
- Open Unity Hub for the first time.
PC Instructions available via the first video on this page.
Step 2: Download and install Unity version 2019.4 (~10 minutes depending on your computer and internet connection)
There are many different versions of the Unity software, as its developed and released over time. During this workshop, we’ll be using version 2019.4. You’ll notice that there might be several versions of 2019.4. It doesn’t matter which one.
- In the Installs tab, click Add to add a new Unity version.
- Choose 2019.4._
- Choose to install Visual Studio (for Mac or PC)
- Accept any necessary terms and conditions and begin installation
Step 3: Create a Unity ID
- From the Account menu in Unity Hub, click to Sign in.
- If you already have an account, sign in. Otherwise, you can create a new Unity ID.
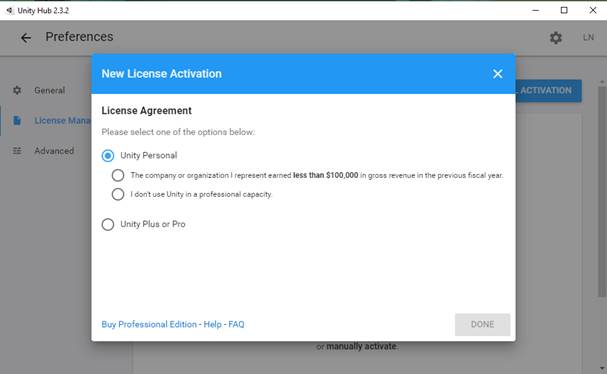
You may receive a notice about needing to activate a license. You can do this under the settings menu (click the cog in the upper-right corner). From there, you can click License Management in the menu and choose a personal license.
Step 4: Download and Import the Unity Package (~10 minutes depending on your computer and internet connection)
Unity packages are a handy way of sharing and re-using Unity projects and collections of assets. Packages consist of collections of file and data that make up Unity projects. For our workshop, we’ve provided you with a Unity package of the Eastman Quad.
There are two options of this package:
Option 1: Robust – The full, detailed 3D version of Eastman Quad (~800 MB)
Option 2: Minimal – Rush Rhees Library + the quad green (recommended for slower internet connections) (~450MB)
Step 5: Download and review the workshop handout.
The handout provides info about the Unity interface, key terms, and navigation tips. If you have access to a printer, please print it.
Step 6: Use a Mouse*
You do not need a mouse to participate, but if you’re a new user, it will be very helpful. Otherwise, please be prepared to right-click on your computer’s track pad.